Its been a awhile but I have some new fawns in a variety of colors including two new ones, chocolate and tan! Get them in my Etsy shop while they last.
Showing posts with label Plush. Show all posts
Christmas Collection 2010
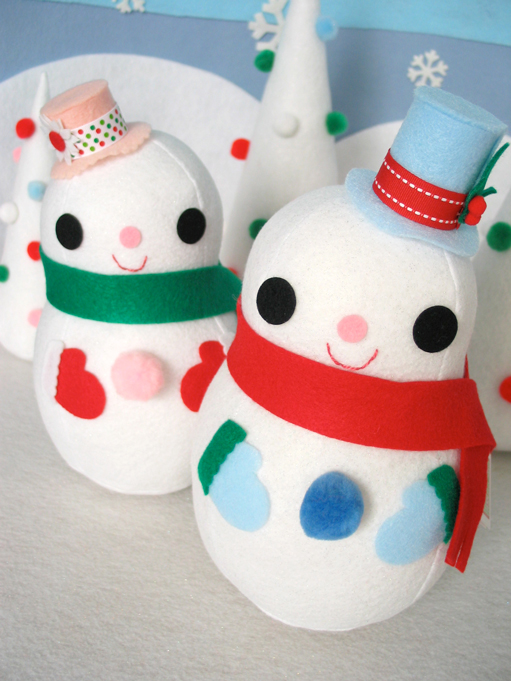
The holidays are fast approaching and I have finally finished my Christmas inventory. I now know what an elf must feel like getting ready for Christmas. As I mentioned in my last post my home has been scattered with red, green, pink, and white felt since August. My Etsy shop is now filled with Christmas goodies! These adorable snow people available in 4 styles and are the newest addition to my Christmas Collection.
Its also time for the Christmas giveaway. The last two years I have given away a white reindeer and fawn. This year I thought I would leave it up to you guys. What should I giveaway this year? Which of the following would you choose?
Snowman
Snow Seal
Polar Bear
Ornament Set
Fawn
Indie Banditas!
Hey!

Just a short post to bring to your attention that RAMPAGE TOYS will be selling tons of new and AWESOME stuff at the Port Townsend Indie Banditas Bazaar on this coming Staurday, June 26th - 10am 'till 5pm.
I'll have NEW limited edition (very short run) resin, lots of clothing, plush, jewelery, editioned screen prints and much much more!
Here's the event flyer :-)
I'll make sure to have pictures up next week, at which time all left over items will be up on Etsy, at MONSTER (in Ballard - Seattle) in Schmancy (Downtown Seattle) or on my new developing BigCartel site!
FAWNZILLA!
My biggest plush to date! At 2 feet tall and 4 lbs she's my symbol to THINK BIG and follow my dreams. I have always wanted to make a large scale version of my signature pink fawn. I started Sunday night with piecing together the pattern enlarged from my copy printer. By Tuesday night I had finished her with the last stitch of her embroidered eyelashes. I imagine her to be the focal point of my fantasy toy store or perhaps she'll make an appearance at my next show. ;)
Easter Sweets
With Easter just around the corner its time to unveil my newest plush characters. There is something about a duck that just makes me laugh and smile. They're such a goofy bird and I knew I had to design one for my collection. One thing led to another and well I couldn't have a Mama Duck without a bunch of baby ducklings.. sooo why not have a whole duck family as part of my Easter collection.
Each baby duckling sits in a round box covered with felt and felt flowers. The girls are dressed in a removable bonnet and the boys wear a mob cap and gingham tie.There is just enough room in the box to add a few Easter treats of your own. These darling ducklings will surely be treasured by someone special as an Easter gift. Visit my Etsy shop for more details.

Papa and Mama Duck


PLUSH!!!!
Welcome to a new RAMPAGE blog posting!!! I hope this finds you all well, and surrounded by mounds of RAMPAGE toys and other such awesomeness!!!
Anyway, after being in the works for ages, the RAMPAGE plush series is in production and out for sale. These cute, cuddly, fuzzy (and ankle-biting) fellahs are up for sale at Monster Art and Clothing (<--click for more info) in Ballard, Seattle. They will also be up for grabs on the new RAMPAGE TOYS Etsy page (http://rampagetoys.etsy.com/). Bear with me while I get things up there, and do feel free to contact me if you need a cuddly companion immediately!
Marketing jargon aside - here it is: the first run of the RAMPAGE plush line - fresh off the sewing machine!!!! We've got Choco-chip, B-Scotty, Cupcake and Jellyo (who you'll be introduced to in an upcoming post - I know, you were worried).

Above: my wonderful RAMPAGE assistant, hard at work on the Singer! Making toys is FUN!!!
Also, don't forget t get you RAMPAGE TOYS t-shirt! You can send me a blank shirt to screen print, or put in an oder for a size and prefered color.
Just e-mail rampage.toys@yahoo.com !!!!!

Also, don't forget t get you RAMPAGE TOYS t-shirt! You can send me a blank shirt to screen print, or put in an oder for a size and prefered color.
Just e-mail rampage.toys@yahoo.com !!!!!
Easter Sneak Peek
I think Easter is becoming my second favorite holiday right after Christmas. I love the pastels and all the cute critters associated with the holiday. Ducks and baby ducklings have been at the top of my list for new critters to make. These little darlings will be available next month as a limited edition. I'm also working on an Easter tutorial featuring bunnies and mushrooms I can't wait to share.
Christmas Collection 2009
I've added a new plush cutie to my Christmas Collection. I think snow seals must be one of the cutest animals around.. right of there with the chihuahua. I was inspired by another artists interpretation and I knew I had to make one for my collection. You can find this sweet guy along with the rest of the collection in my etsy shop.

Fantastic Toys Powderhorn Art Fair
My first outdoor craft show didn't go as smoothly as I had hoped it would. The weather forecast had been predicting thunderstorms all weekend and sure enough the night before it rained soaking my tent through and through. Thankfully I set up my inventory the day of so nothing was damaged ...just a leaky wet tent. Minutes before the show was about to start, black ominous clouds rolled in overhead and nasty winds forced us to shut everything thing up. Eventually the rain subsided but the winds continued to blow knocking my pretty things onto the wet ground. The first day was so disappointing I thought I would never do another show again.
Day two went much better. The weather was beautiful.. sunny and cool. I was much more optimistic. I made some corrections to some of the problems from the day before and the day was much less stressful. I never reached my sales goal but I ended the day with more experience and looking forward to the next outdoor show. In fact I received an invitational award to return next year.


Cat Toy Critters Tutorial
I made this cat toy tutorial quite a few years ago. I thought it would be fun to post in on my blog since I didn't have one at the time. Please remember I have designed these for personal use only. Make as many as you want for friends and family but please do not sell them under any circumstances. Have fun!
Your Kitty's gonna love these Cat Toy Critters. Fill em with catnip or hang them from a string. Stinky will think your the cats meow.
Materials Required
Assorted colors of craft felt
Embroidery floss or thread for stitching
Glass beads for eyes (OPTIONAL)
Fiber fill or cat nip for stuffing
Choose a critter and cut out pattern from the paper. Pin pattern pieces to the felt and cut out accordingly.
Sewing- A ladder stitch is recommended for best results.
1. Start out by sewing bird belly to one side of bird half and continue up and around over head until you reach the tail.
2. Continue on with the tail in position until the end, knot, then finish the other side of tail.
3. Now go back and finish sewing the other side of the bird belly. Wow you can see the bird taking shape!
4. Sew about 3/4 of the bird base on leaving enough room open to stuff bird. Fill with fiber fill or a premium catnip, finish sewing base on.
5.Now your ready for the eyes and wings. Knot thread to position of eye, slide on glass bead and go through to other side and slide on other the bead, pull tightly to create small indentation in felt. Go through a couple of times to securely fasten eyes. (You may choose to glue felt eyes on instead to prevent any injury to your cat.) Clip wings to give the illusion of feathers then fasten to bird body as indicated on pattern.
6. Stitch on bird feet. Voila your finished!! Now go make the other two critters, the same technique may be applied to those as well.
Assorted colors of craft felt
Embroidery floss or thread for stitching
Glass beads for eyes (OPTIONAL)
Fiber fill or cat nip for stuffing
Choose a critter and cut out pattern from the paper. Pin pattern pieces to the felt and cut out accordingly.
Sewing- A ladder stitch is recommended for best results.
1. Start out by sewing bird belly to one side of bird half and continue up and around over head until you reach the tail.
2. Continue on with the tail in position until the end, knot, then finish the other side of tail.
3. Now go back and finish sewing the other side of the bird belly. Wow you can see the bird taking shape!
4. Sew about 3/4 of the bird base on leaving enough room open to stuff bird. Fill with fiber fill or a premium catnip, finish sewing base on.
5.Now your ready for the eyes and wings. Knot thread to position of eye, slide on glass bead and go through to other side and slide on other the bead, pull tightly to create small indentation in felt. Go through a couple of times to securely fasten eyes. (You may choose to glue felt eyes on instead to prevent any injury to your cat.) Clip wings to give the illusion of feathers then fasten to bird body as indicated on pattern.
6. Stitch on bird feet. Voila your finished!! Now go make the other two critters, the same technique may be applied to those as well.
Christmas Giveaway! Win a White Reindeer!!!
Giveaway is now closed.

As part of my blog launch I thought it would be nice to offer another freebie. This is the first year I have made this gorgeous white reindeer. This limited edition softie is only available during the holiday season. I'll even pay for shipping within the United States.To enter, fill out the form to the right and at the end of the month I'll pick a WINNER! Contest ends Nov. 30. Make a comment to improve your chances of winning. Who knows I may have a giveaway every month so check back often. :D
Christmas has arrived early this year!
Cupcake Softie Tutorial
Make a yummy cupcake in your favorite flavor. Decorate it any way you wish, add frosting, sprinkles or fruit. Share a cupcake with a friend or family member.
Celebrate your LOVE of cupcakes.
A PDF version with instructions and pattern is also available for download.
Download Cupcake Pattern and Tutorial
I'd love to see photos of your delicious creations! Post them at the flickr group I created.
http://www.flickr.com/groups/665113@N22/
Please do not sell the cupcakes. They are to be made for your enjoyment and given away as gifts to family or friends. Please ask me if you can use my photos or tutorial before you post them anywhere else online.
Materials Required
Craft felt
Craft glue
Needle/Thread
Trim-ribbon
Polyfill stuffing
Embroidery floss
Pins

Instructions
Cut out felt from pattern pieces in your favorite flavor and cup color.
1. Sew up cake side with a backstitch.
2. Gather cake base with a gathering stitch.
3. Stuff cake full with polyfill and pull opening closed with gathering stitch. Secure thread with knot.
4. Sew baking cup side. Pin cup base to side and sew together.
5. Glue eyes on and embroider mouth with embroidery floss.
6. Decorate cupcake to your liking. Add sprinkles, frosting, or strawberries. Add trim or ribbon around cup. Have fun!
Subscribe to:
Posts (Atom)